

Contents
1. Introduction to bug reports
2. Best Practices and Information
1. Welcome to the Bug Report Page
We strive to make X-Plane the most realistic and immersive flight simulator available. If you’ve encountered a bug, glitch, or unexpected behavior while using X-Plane, we want to hear from you! Your reports help us identify and fix issues, ensuring a smoother experience for all pilots.
When filing a report, include as much detail as possible—such as steps to reproduce the issue, screenshots, and log files—to help our team investigate and resolve it efficiently. We need to be able to reliably reproduce what you’re seeing!
Scroll down further for more information or best practices. Thank you for helping improve X-Plane!
2. Best Practices and Information
DO’S
- FOR ALL BUG REPORTS on the desktop simulator, include a Log.txt with ALL bug submissions. This can be found in your X-Plane folder.
- FOR ALL CRASH REPORTS include the .dmp file in Output/Crash Reports if the automatic crash reporter came up, and please do submit the bug automatically with the report form.
- Include screenshots or a movie of any visual bug/artifact
- Include a screenshot of your rendering settings for any bug that’s affected by rendering settings
- Try and figure out how to reproduce the bug quickly and easily. If possible include a saved situation file so that we can start the sim in the same location/altitude IF NECESSARY.
- If you experience this issue only with an add-on product, please try reproducing the issue with a default aircraft/airport before submitting a report.
DO NOT’S
- Do not submit requests for help. This is not a tech support page. Contact support here.
- Do not submit more than one bug in the same form. Please seperate them into ONE SUBMISSION per bug.
- Do not submit bugs caused by add-ons or plugins. They need to be sent to the original authors. The best way to know is by removed your add-on/plugin and see if the bug persists.
- Do not re-submit the same bug repeatedly…even between versions. Bugs that have been fixed appear in the ChangeLog. All others are assumed to be not-fixed.
All submissions are screened by hand so these guidelines help us to be expedient in processing them. Submissions that do not follow the guidelines will not be processed.
X-Plane beta versions allow users to test the latest features and improvements before they are officially released. However, since beta updates can sometimes introduce new bugs or unexpected behavior, we recommend installing a second copy of X-Plane to test the beta while keeping your main version stable.
To do this:
- Create a separate installation – Copy your existing X-Plane folder and rename it (e.g., “X-Plane Beta”).
- Enable beta updates – Open the X-Plane Installer, select your beta test copy, and check the “Get Betas” option.
- Test without risk – Use this version to explore new features while keeping your primary X-Plane installation unaffected.
By maintaining a separate copy, you can enjoy early access to new updates while ensuring a smooth experience with your main simulator.
Starting with X-Plane 12.1.4, we’ve included a “Safe Mode” to the sim. The feature works in a similar capacity to other similarly known “Safe Modes.”
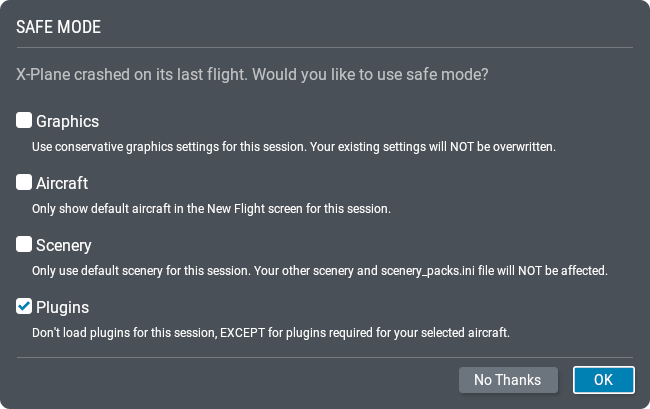
The following options are available
- Graphics – Using a lowered graphics setting for the current loaded session. This will not overwrite your existing settings for future sessions
- Aircraft – Only loading default aircraft for current loaded session
- Scenery – Using only default scenery for current loaded session. X-Plane will not read anything in the “custom scenery” folder or your “scenery_packs.ini”
- Plugins – X-Plane ignores all plugins, with exception to plugins that are required for your loaded aircraft
Accessing Safe Mode
Safe Mode can be accessed via a few possible methods
- On Simulator Crash
- Holding down “Ctrl” during boot up
- Loading up the provided .bat files to load the desired safe-mode scenario in your X-Plane folder. This can typically be found in “X-Plane/Support”
From time to time, we may ask for an ETW trace of your sim session. Event Tracing for Windows (ETW) provides a mechanism to trace and log events that are raised by user-mode applications and kernel-mode drivers.
Performing an ETW trace
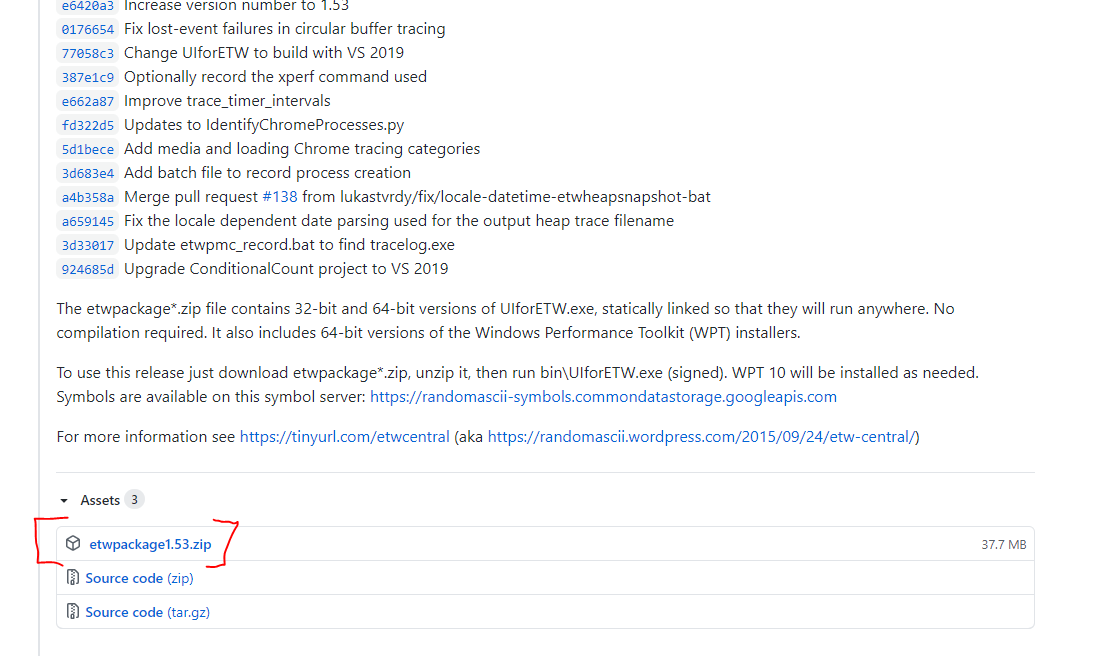
1. Please download the ETW package here : https://github.com/google/UIforETW/releases
2. Once downloaded right click on the folder and select ‘Extract all’ from the drop down menu
3. Next, open the unzipped folder and navigate to the bin folder (you should have a similar path to the one below)”Downloads\etwpackage1.53\etwpackage\bin”
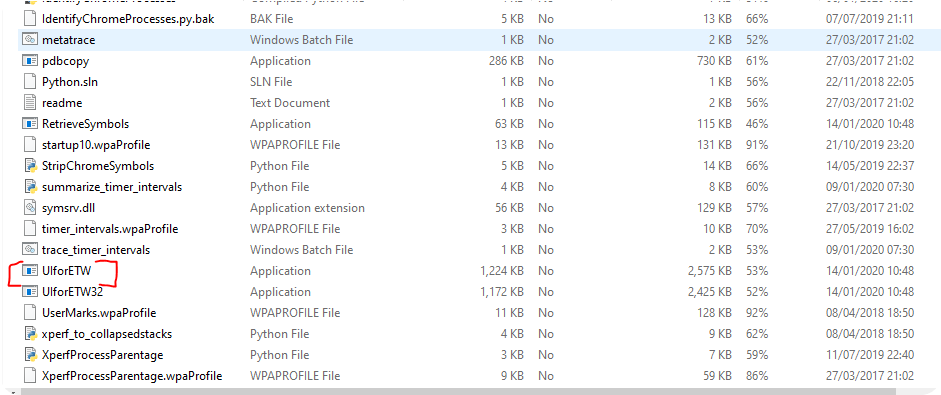
4. Scroll down and click the UIforETW application

5. Once opened, check the ‘fast sampling’ check box
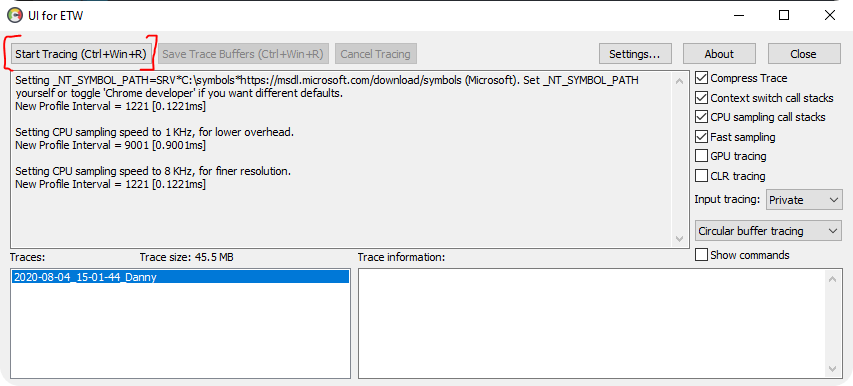
6. Click the ‘Start Tracing’ box and launch X-Plane
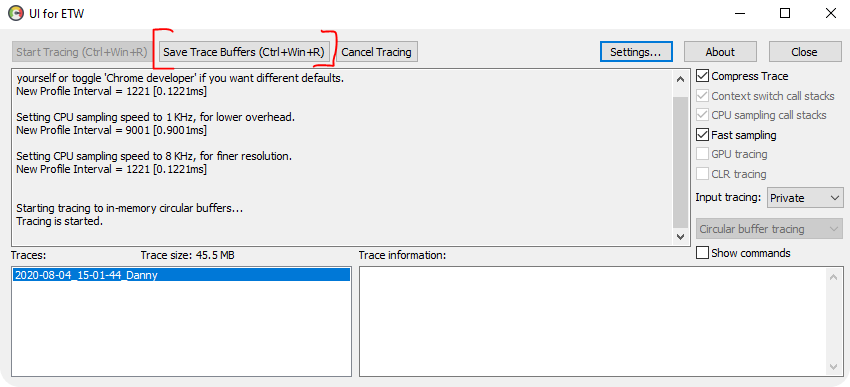
7. Once you encounter the issue in X-Plane, click ‘Save Trace Buffers’. Note: It is important to save the trace before leaving X-Plane. You can save multiple traces in the same session, so you can save a trace to diskevery time you get bad performance.

8. Once saved, you should have a .etl file (usually found in your documents >etwtraces folder)
9. Please send this file to us. Depending on the file size, you may need to use a service such as Google drive or Dropbox. You can then send us the direct link to access them
One of X-Plane 12’s most radical features, is the inclusion of a new weather engine, weather server and volumnetric clouds. Combined, this is continually evolving into one of the most advanced weather simulations in X-Plane today. We’re always open to any feedback (visual or data), however we do require weather dumps to help triage weather inquiries.
What is a Weather Dump?
A weather dump is a snapshot of the surrounding weather conditions of your aircraft at a point in time. This is useful for us, as our developers can then load up the exact scenario and compare (a limited form of historical weather)
How do I send a Weather Dump?
Weather dumps are incredibly simple to do.
- 1. First ensure your aircraft position is close to the surrounding affected area of your query. The dump is “in situ”, meaning the location of the dump has to be precise
- 2. When satisifed, navigate to the top menu bar. Navigate to “Developer -> Dump to Log”. Click on “Dump Weather State”
- 3. You’ve now saved the weather to the log. It may be useful to take the time now to gather additional information. Images of the affected area, co-ordinates, current expected METAR/TAF etc.
- 4. Send off your log and additional details to us! Your log can be found in your root X-Plane folder, and will be called “Log.txt”
I want to report something, but I’m concerned someone else has/may have submitted already!
File it anyway! Users would be surprised to know how many bugs don’t get fixed, because people do not submit a bug report to Laminar. Multiple reports also let us know how common an issue is!
I didn’t get a response to my bug report!
If you used the bug form, we’ve got your report. A bug may not always be confirmed or reproduced by our team. Make sure you give us really detailed and repeatble data, so that we can catch it easier!
How many weather dumps do you need? Surely one is enough?
Keep giving us as many as you can! Weather is a complicated field, and the more reports we have, the better!
Can I grab a list of all the confirmed bugs?
This feature is unavailable, however you can search for individual XPD’s assigned to you!
When will you fix (x)?
There are no timelines on bug reports, because they each come with their own complexities and dependencies. Keep an eye on our release notes to see how many XPDs we managed to resolve!
I want to submit a report, but there is a 5mb limit and the log file is huge!
Contact support. Something has gone incredibly wrong with your install. Support will ask you for alternate ways to upload.
3. Submit your bug
4. Bug Tracking

If your bug report was successfully reproduced, or pending investigation, you will be emailed with further information along with an XPD number. With this number, you can track your issue all the way through. Our bug database can be accessed here
